Installing and starting the synchronization service
Checking the status of the synchronization service
Section titled “Checking the status of the synchronization service”In the final installation step, it must be checked whether the synchronization service is installed and started on the touch terminal PC. This service periodically transmits local animal and feeder data to the Urban Cloud server. The color of the circular status indicator (digit ➀) to the left of the fourth list entry Data transmission active on the installation screen provides this information:
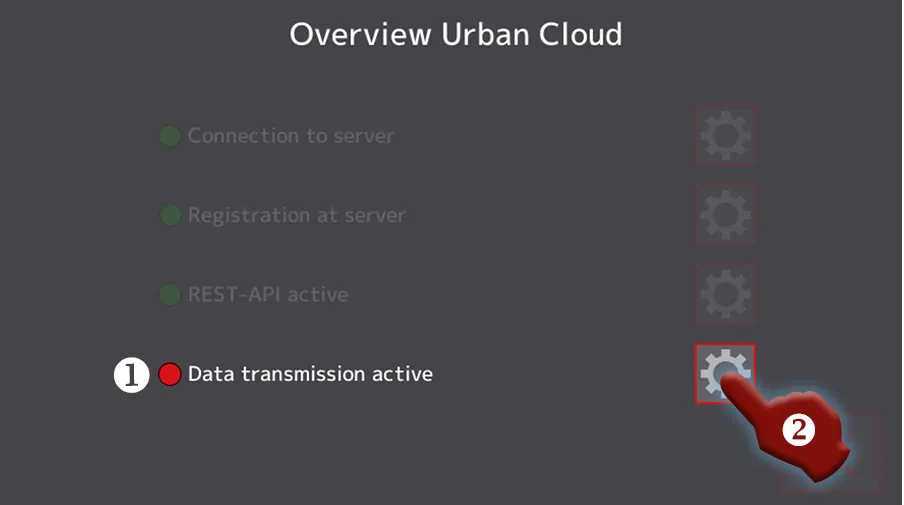
Screenshot 1: Cloud setup, synchronization service activation status
- If the status indicator ➀ green lights up, the synchronization service has already been installed and started. Congratulations, the Urban Cloud installation is now complete!
- If the status indicator lights up red, the synchronization service is currently not working correctly, and action is required.
- Tap the button (digit ➁) to the right of the
Data transmission activelist entry to open the installation screen for the synchronization service (Screenshot 2). - Install and start the synchronization service according to the instructions in the next section.
- Tap the button (digit ➁) to the right of the
Installing and starting the synchronization service
Section titled “Installing and starting the synchronization service”Installing and starting the synchronization service is done on a single screen, shown below:
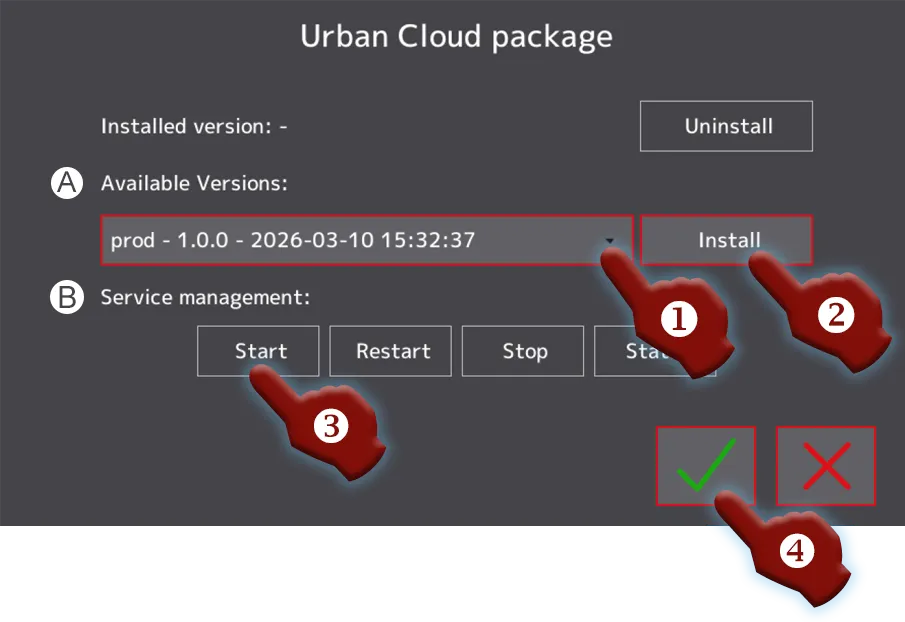
Screenshot 2: Cloud setup, installing and starting the synchronization service
Installing the synchronization service
Section titled “Installing the synchronization service”First, the software package for the synchronization service must be installed; this package is retrieved from the Urban Cloud over the internet.
- Make sure that the latest version of the software package is selected in the Ⓐ
Available Versionsdropdown menu. To do this, tap the red-outlined button (digit ➀) to open the version list of the dropdown menu. Then select the most recent version number from the displayed list. - Tap the
Installbutton (digit ➁), to start installing the synchronization service. - After a short installation time, the content of the popup window changes and a large green checkmark ✓ appears, confirming the successful installation. Acknowledge this success message.
Starting the synchronization service
Section titled “Starting the synchronization service”For the synchronization service that has just been successfully installed to begin its work, it must be started in a further step, on the same screen (Screenshot 2).
- Tap the
Startbutton (digit ➂) under the heading ⒷService managementto start the synchronization service. - After a short start-up time, the content of the popup window changes and a large green checkmark ✓ appears, confirming the successful start of the service. Acknowledge this success message.
- After successfully setting up the service, tap the ✓ checkmark button (digit ➃) to leave the installation screen.
- The status indicator (Screenshot 1, digit ➀) to the left of the
Data transmission activelist entry should now light up green, signaling that the synchronization service has been successfully installed and started.
The installation of the Urban Cloud on the Alma Pro feeding terminal is now successfully complete.